
Arctic travel clothing guide questions usually start the same way: “I’m not trying to look cool, I’m trying to stay warm without packing my whole closet.” That’s the right mindset, because in the Arctic, comfort and safety beat style points every time.
The tricky part is that “warm” isn’t one outfit, it’s a system: layers that manage sweat, block wind, and keep insulation working even when conditions change. Many people overbuy the wrong piece, then discover the real problem is a wet base layer or a leaky glove cuff.
This guide focuses on what actually works for most travelers from the US: practical layering, what to pack for common Arctic activities, and where people tend to make expensive mistakes. You’ll also get a quick self-check list, plus a packing table you can copy.
What “warm enough” means in Arctic travel (and why people misjudge it)
Arctic cold isn’t just “low temperature,” it’s often wind + moisture + long exposure. You can feel fine while moving, then cool down fast when you stop for photos, wildlife viewing, or a snowmobile break.
According to the National Weather Service (NWS), wind chill can make it feel significantly colder than the air temperature, which matters for exposed skin and how quickly you lose heat. Even if you’re not chasing extreme expeditions, you’re still dealing with that effect on face, hands, and feet.
- Dry cold: insulation works well, but any sweat becomes a problem once you slow down.
- Wet snow / coastal wind: shells and waterproofing matter more than people expect.
- Stop-and-go touring: you need easy venting and quick layer changes.
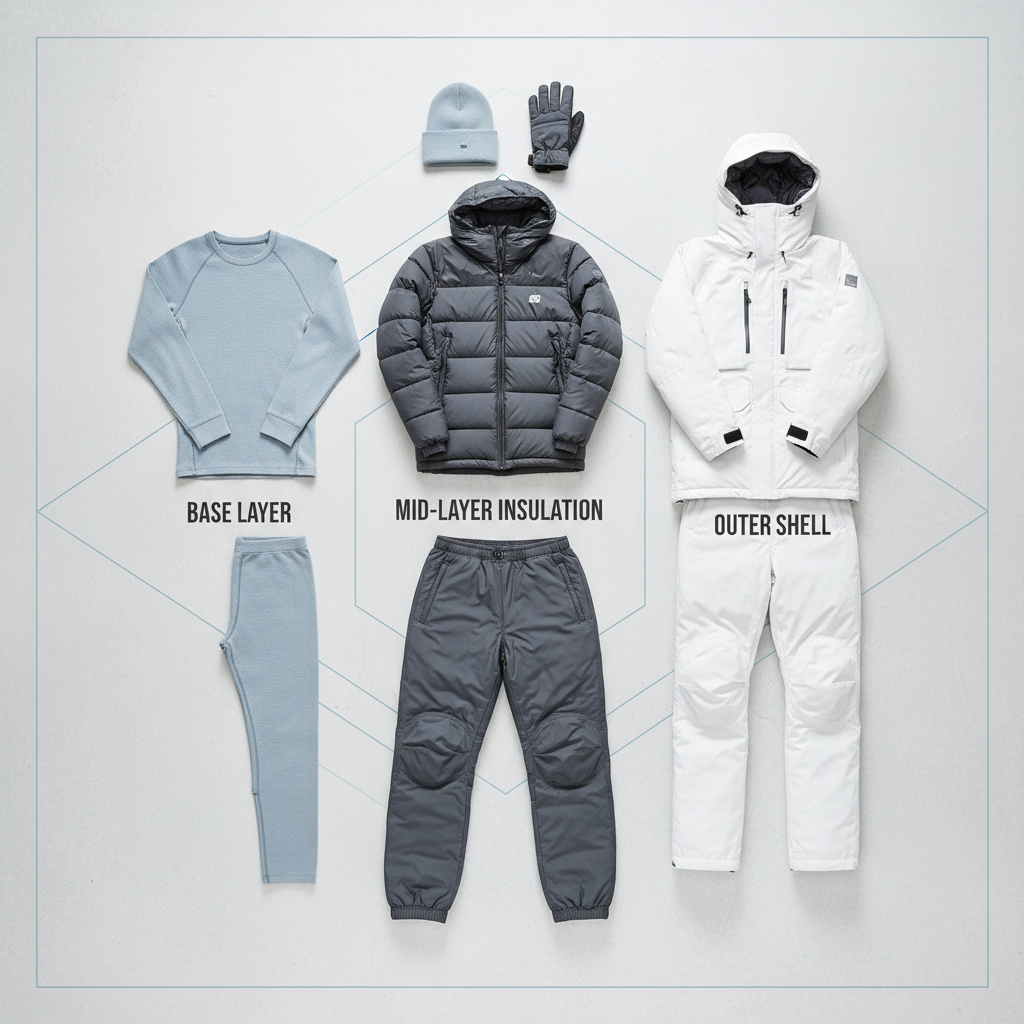
The layering system that carries most trips
Arctic packing gets simpler when you treat clothing like a modular kit. This arctic travel clothing guide approach is about keeping your insulation dry and your wind barrier reliable, not piling on bulky pieces.
Base layer: manage sweat (yes, even in the cold)
Your base layer’s job is moisture control. If it stays damp, your mid layer gets less effective and you’ll feel chilled during rest breaks.
- Best bets: merino wool or quality synthetics (polyester blends) designed for cold.
- Avoid: cotton next to skin, it tends to hold moisture and cool you down.
- Fit: close to skin but not restrictive, so moisture can move outward.
Mid layer: insulation you can scale
This is the “warmth engine.” Most travelers do well with one heavier insulating layer plus a lighter option for flexibility.
- Fleece: breathable, forgiving, great for active days.
- Down: high warmth-to-weight, but can lose loft if it gets wet.
- Synthetic insulation: often better in damp conditions and for stop-and-go touring.
Shell layer: wind and weather control
A shell is where many “warm” outfits fail. A puffy jacket without a real wind barrier can feel weak in gusty conditions.
- Look for: windproof fabric, adjustable hood, sealed or well-designed seams, good cuffs.
- Ventilation: pit zips or front zips that you can manage with gloves on.
Quick self-check: what kind of Arctic trip are you actually dressing for?
Before you buy anything, pin down your main pattern. People who feel “always cold” are often just under-layered for their activity mix, or they’re sweating then freezing.
- Mostly touring + photography: longer standing still, prioritize insulation and wind protection.
- Snowmobiling: high wind exposure, prioritize windproof shells, face protection, and sealed gloves.
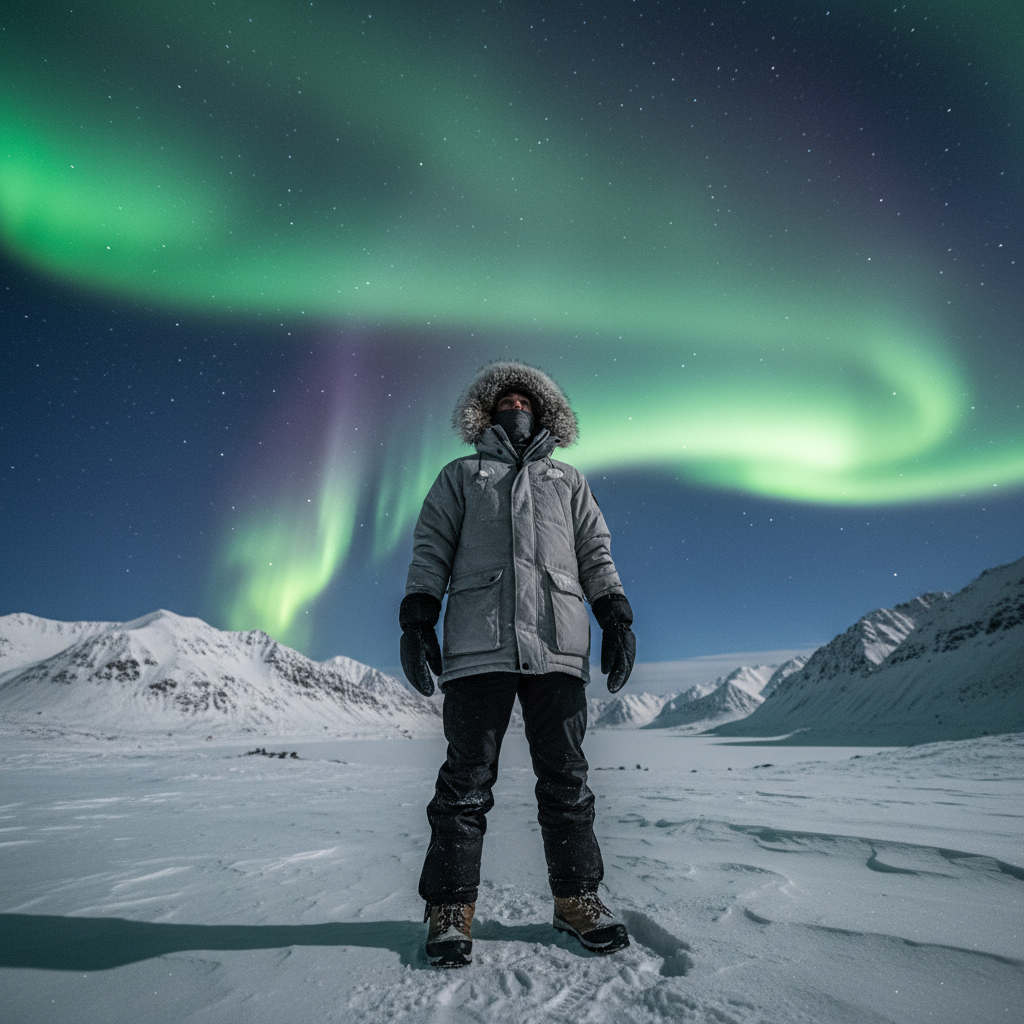
- Northern lights viewing: low movement, prioritize big warmth in legs/feet and a serious parka.
- Easy hiking / walking: you’ll heat up, prioritize breathability and easy venting.
Key takeaway: if you expect long stillness, add more insulation. If you expect steady movement, add more breathability and better moisture control.
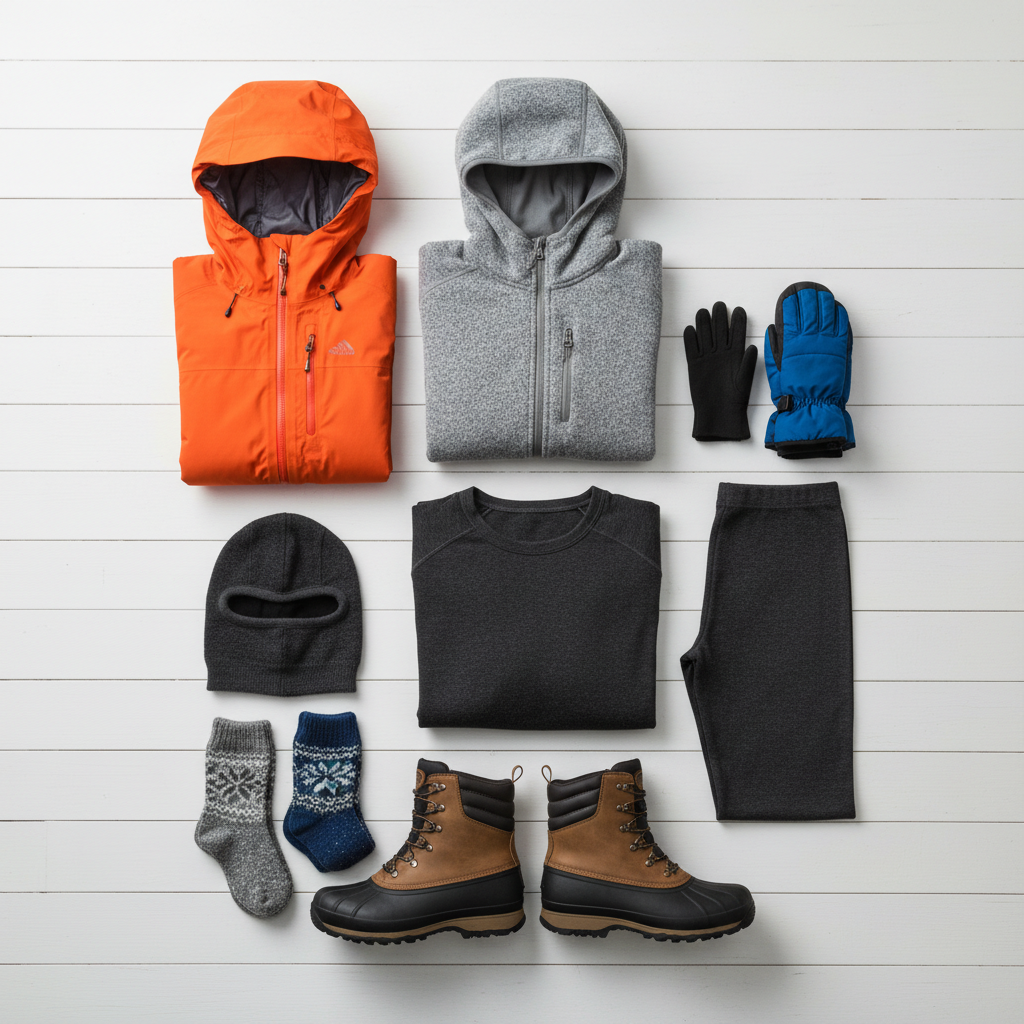
What to pack: a practical Arctic clothing checklist
This arctic travel clothing guide checklist aims for “enough options” without overpacking. Exact counts depend on trip length, laundry access, and whether your operator provides outerwear.
- Base layers: 2–3 tops, 1–2 bottoms (rotate to keep dry)
- Mid layers: 1 warm fleece or sweater, 1 insulated jacket (down or synthetic)
- Shell: 1 windproof/water-resistant shell jacket, shell pants if windy or on snowmobile
- Parka option: 1 expedition-style parka for long stationary time (or rent one)
- Hands: liner gloves + insulated mittens; bring a backup pair
- Feet: 1 insulated boot (appropriate temperature rating), wool socks, optional vapor barrier sock for very cold/damp setups
- Head/face: beanie, neck gaiter, balaclava, goggles if wind-driven snow
- Extras that matter: chemical hand/foot warmers, sunglasses (snow glare), thermos
Use this table to build your outfit by temperature and activity
These are starting points, not promises. Your cold tolerance varies, and medication, circulation issues, or past cold injuries can change what “safe” feels like. If you have health concerns, it’s sensible to check with a clinician.
| Scenario | Base | Mid | Outer | Hands/Feet |
|---|---|---|---|---|
| Walking town/tour stops (mild wind) | Merino/synthetic top | Fleece | Shell + light insulated jacket | Gloves, wool socks, insulated boots |
| Northern lights (standing still) | Warm base top + bottom | Fleece + insulated jacket | Expedition parka + insulated pants | Mittens, toe warmers, thicker socks |
| Snowmobile / open vehicle | Moisture-wicking base | Insulation layer | Windproof shell (jacket + pants) | Goggles, balaclava, mittens, warm boots |
| Active hike (you run warm) | Lighter base | Light fleece | Breathable shell, venting | Gloves you can remove, avoid overdressing |
Real-world tips that keep you warmer than buying “the warmest jacket”
Most discomfort comes from small leaks: wrists, neck, ankles, and face. Fix those and the rest often clicks.
- Seal the gaps: gauntlet-style mitts, a snug neck gaiter, and a hood that moves with your head.
- Protect your face: wind on cheeks and nose can be miserable, a balaclava helps more than a thicker jacket.
- Don’t trap sweat: if you’re overheating, open vents early. Waiting until you’re drenched is the classic mistake.
- Hands: gloves vs mittens: mittens usually stay warmer because fingers share heat, liners keep dexterity for camera/phone.
- Feet are the truth: boots too tight reduce circulation, which can feel like “bad insulation” even with thick socks.
Small but useful habit: pack one “emergency warmth” combo you don’t touch unless you truly need it, dry base layer + thick socks + warm mittens, it’s cheap insurance when weather shifts.
Common mistakes (and what to do instead)
- Wearing cotton hoodies as insulation: swap for fleece or wool, you’ll get warmth without holding moisture.
- One giant parka, no layering: add a proper base and mid layer, you’ll adapt faster indoors/outdoors.
- Too many socks: two thick socks can squeeze feet, try one quality wool sock and a boot with room.
- Ignoring eyewear: snow glare can be intense, bring sunglasses and consider goggles for wind.
- No plan for rentals: many Arctic operators provide suits/boots, confirm sizing and what “included” really covers.
When to get professional or local advice
If your trip involves remote travel, long exposure, sea ice, or open vehicles, it’s worth getting guidance from your tour operator or a specialty outdoor retailer who understands local conditions. If you have circulation issues, diabetes, Raynaud’s, or prior frostbite, clothing choices can become a medical-risk topic, and you should consider asking a clinician what precautions make sense for you.
According to the Centers for Disease Control and Prevention (CDC), frostbite and hypothermia are serious cold-related risks, so if you notice numbness, confusion, uncontrollable shivering, or skin turning pale/waxy, seek help promptly.
Conclusion: build a system, then refine it
A solid arctic travel clothing guide boils down to three things: stay dry, block wind, and add insulation where you’ll be still the longest. If you’re unsure where to start, build a reliable base layer + mid layer combo, then make sure your shell and hand/face protection have no obvious weak spots.
Action steps: check what your operator provides, then do a quick at-home test by wearing your layers outside for 15–20 minutes with small adjustments. The goal isn’t perfection, it’s knowing what you’ll change before you’re cold on day one.
FAQ
- What is the best base layer for Arctic travel?
Merino wool and performance synthetics are common picks because they manage moisture better than cotton. If you run cold, choose a heavier weight, if you run hot, go lighter and rely on mid layers. - Do I need an expedition parka for an Arctic vacation?
Not always. For active days with walking and indoor stops, layering can be enough, but for northern lights viewing or long stationary time, a true parka or a rental often feels worth it. - How do I keep my hands warm while taking photos?
Use liner gloves under mittens, then pull the mitten back only when needed. Chemical hand warmers can help, but good cuff seals and wind protection usually matter more. - Are snow pants necessary?
If you expect wind, sitting on snow, or snowmobile travel, insulated or shell pants tend to improve comfort. For casual town use, many travelers skip them and focus on warm base layers. - How many layers should I wear in the Arctic?
Most people end up with 3 core layers, plus optional “boost” insulation for still conditions. The right number changes during the day, which is why zippers and venting are so valuable. - Should I buy or rent Arctic outerwear?
If you’ll use it again, buying can make sense. If this is a one-time trip, rentals often save money and space, just confirm warmth rating, sizes, and what’s included. - What boots work for Arctic travel?
Look for insulated winter boots with enough room for circulation and a grippy outsole. If you’re unsure, ask your operator what locals wear for the same activities.
If you’re planning your first cold-weather itinerary and want a simpler path, it can help to build your packing list around your main activities and expected time standing still, then fill gaps with a few high-impact items like mittens, face protection, and a dependable shell.