
How to use phone tripod for travel photos comes down to three things: stable placement, a repeatable setup, and a few camera settings that keep your shots sharp even when you’re moving fast.
If you’ve ever tried to prop your phone on a rock, a café cup, or a backpack, you already know the pain, photos tilt, horizons bend, and group shots turn into a dozen retakes. A small tripod fixes most of that, but only if you use it with intention instead of treating it like a tiny stand.
This guide focuses on what actually works while traveling: how to pick a spot, set height and angle, avoid “tourist tripod” framing, and shoot faster without annoying everyone around you. I’ll also flag common mistakes that make tripod photos look stiff, or worse, end with a dropped phone.
Pick the right spot first (stability beats convenience)
The fastest way to mess up a tripod shot is choosing a pretty location with a shaky surface. Before you extend anything, check the ground and the environment, wind, vibration, and foot traffic matter more than you think.
Quick stability checks that save you time:
- Surface: avoid bouncy boardwalks, loose gravel, and narrow ledges.
- Wind: on cliffs or beaches, keep the legs shorter and the phone lower.
- People: don’t set up where someone will clip a tripod leg in a crowded walkway.
- Vibration: bridges and viewing platforms can add subtle blur even when the tripod “looks” steady.
Many travel shots look better when the tripod is slightly off to the side rather than dead center on the main path. You get the same background, fewer interruptions, and a safer setup.
Set tripod height and angle for natural-looking travel portraits
Tripods tempt you to shoot from whatever height is easiest. That’s why so many travel photos look like they were taken from knee-level or from an odd downward angle. The fix is simple: match the camera height to the story.
Use this as a practical guideline:
- Solo and couples: put the lens around chest to eye level for a natural look.
- Groups: slightly higher can help everyone’s face stay visible, but avoid extreme top-down angles.
- Architecture: keep the phone level to reduce leaning buildings, step back instead of tilting up too much.
- Food and details: lower the tripod, lock the phone, and shoot with deliberate framing.
On iPhone and many Android models, the widest lens can stretch faces if you’re too close. If you want a flattering travel portrait, step back and use a standard lens option when possible.
Mount your phone securely (and don’t trust “finger tight”)
If you’re learning how to use phone tripod for travel photos, phone mounting is the part that deserves more paranoia. Most travel mishaps happen during mounting, adjusting, or walking away too quickly.
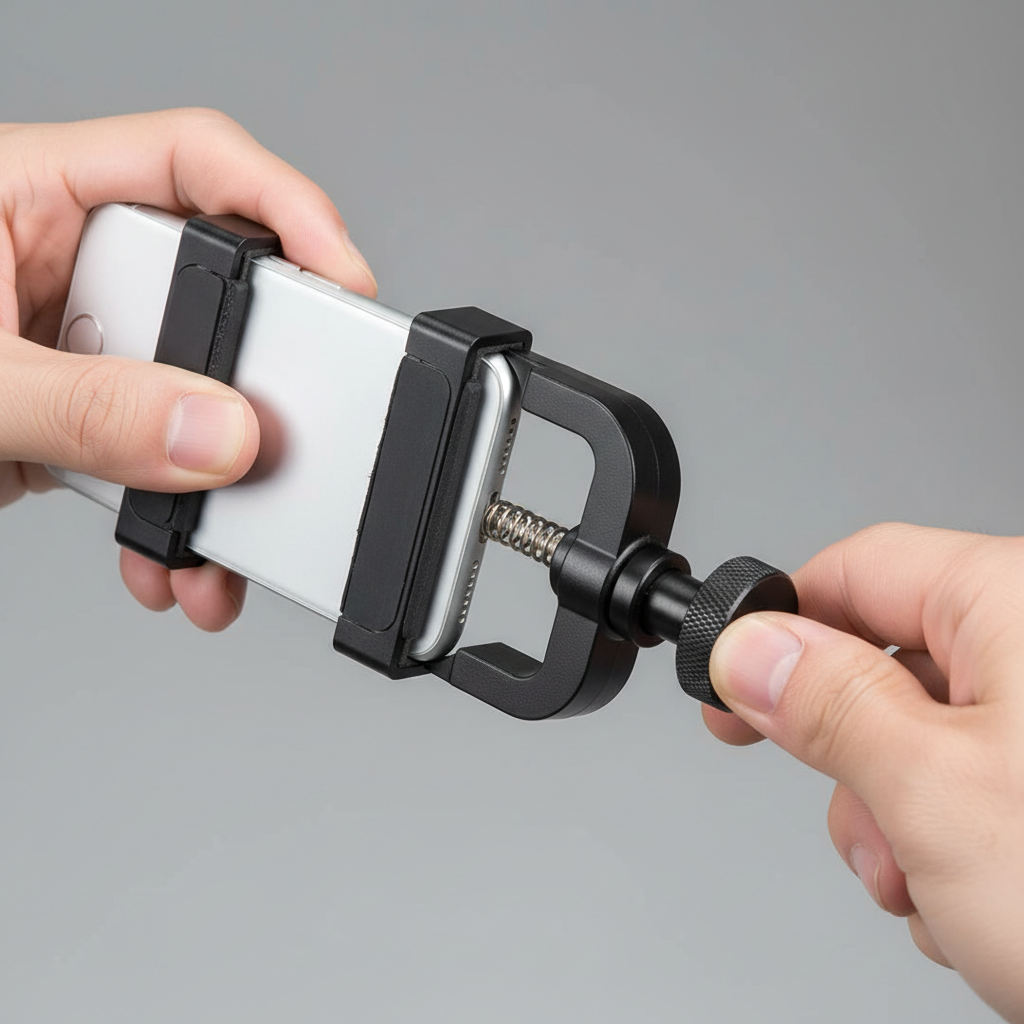
Secure-mount routine (takes 15 seconds):
- Open the clamp fully, center the phone, then release slowly so the jaws bite evenly.
- Give the phone a gentle wiggle test before you extend legs or change angles.
- Confirm the clamp grips the phone body, not a slippery case edge or a button.
- If your clamp has a tightening knob, snug it, then stop. Over-tightening can crack some mounts.
Many cases are slick, especially thin magsafe-style cases. If your phone shifts when you tap the screen, you’ll get blur or crooked framing. A grippier case or a better clamp often solves this more than any camera “stabilization” feature.
Compose faster with gridlines, a level, and a “leave space” habit
Tripods slow you down if you keep nudging the legs for tiny framing changes. Instead, lock the legs, then adjust composition with small head movements and simple on-screen tools.
Three tools that make tripod travel photos look intentional:
- Gridlines: use rule-of-thirds lines for quick subject placement.
- Level: keep horizons straight, especially at beaches and city skylines.
- Negative space: leave breathing room above hats, hair, and landmarks so you can crop later without stress.
According to National Park Service guidance on visitor safety, staying aware of footing and conditions near overlooks matters, so if you’re framing near an edge, step back and zoom slightly instead of creeping forward for “one more inch.”
Get sharper shots: timer, remote, and a few simple settings
A tripod removes hand shake, but it doesn’t remove tap shake. Pressing the shutter can still jiggle the phone, especially on lightweight tripods. Use a timer or a remote so the phone settles before the exposure.

What to use (in order of convenience):
- 3–10 second timer: simple, reliable, great for solo travel.
- Bluetooth shutter remote: faster for multiple poses and group shots.
- Voice shutter / watch trigger: handy in gloves or cold weather, if your device supports it.
Settings that usually help (varies by phone and app):
- Tap to focus on the face, then lock exposure if your camera app allows it, this prevents brightness swings.
- Use HDR in high-contrast scenes like bright skies and dark streets.
- At night, avoid extreme digital zoom, keep the phone steady, and let night mode finish its capture cycle.
Scenario playbook: how to use a phone tripod while traveling
Different places call for different tripod behavior. These mini playbooks keep you moving without overthinking.
Busy city sidewalks
- Keep legs compact, set up off the main flow, and shoot quickly.
- Frame wider than you think, pedestrians will cut through, but wider framing gives you options.
- If you’re doing a long capture, stay close to your tripod, don’t wander off.
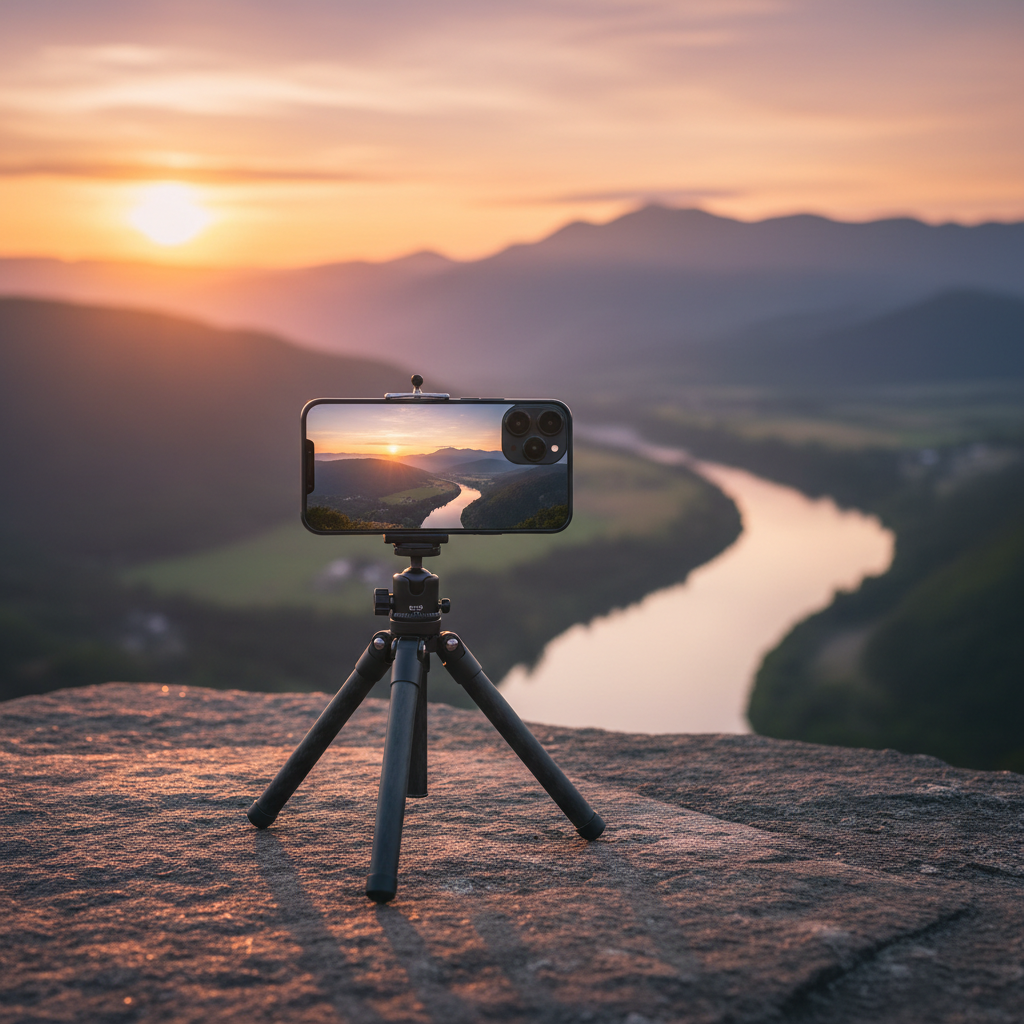
Viewpoints and scenic overlooks
- Lower the center of gravity, short legs beat tall legs when wind picks up.
- Use the level to keep the horizon clean, crooked horizons scream “rushed.”
- Take 2–3 safe variations, then move on so others can enjoy the spot.
Indoor museums, churches, and quiet spaces
- Tripods may be restricted, check posted rules and staff guidance.
- If allowed, use minimal footprint and avoid blocking paths.
- Go for steady, lower-light shots with timer rather than repeated tapping.
Beaches and sand
- Push legs down to firmer sand, then widen stance.
- Wipe sand off clamps and joints before collapsing the tripod, grit wears parts fast.
Common mistakes (and quick fixes)
Most tripod frustration comes from a handful of repeat errors. Fix these and you’ll feel the upgrade immediately.
- Mistake: extending the thinnest leg sections first.
Fix: extend thicker sections first for better rigidity. - Mistake: tilting the phone up to fit a tall landmark.
Fix: step back, keep the phone more level, then crop or use a slightly wider lens. - Mistake: trusting one take.
Fix: shoot a short burst of 3–5 frames, tiny blinks or passersby happen. - Mistake: leaving your setup unattended.
Fix: stay within arm’s reach in crowded areas, theft and bumps are real-world risks.
A quick decision table: choose your tripod approach
If you’re unsure how to use phone tripod for travel photos in the moment, this table helps you pick a setup that matches the scene.
| Travel situation | Best setup | Why it works |
|---|---|---|
| Solo portrait in daylight | Chest/eye height + 3–10s timer | Natural angle, reduces tap shake |
| Group photo | Slightly higher + wider framing + remote | Fits everyone, fast repeats |
| Windy viewpoint | Low height + wide stance | Less sway, sharper frames |
| Night street scene | Timer + night mode + no zoom | Cleaner detail, fewer artifacts |
| Indoor low-light (if allowed) | Compact legs + exposure lock | Stable shot without disruption |
Key takeaways and next steps
Key takeaways: pick a stable spot before you extend the tripod, mount the phone like you mean it, and rely on timer or remote for sharper results. Once those basics become muscle memory, your travel photos stop looking improvised and start looking deliberate.
If you want an easy next step, practice one “signature setup” on your next outing: chest-height tripod, gridlines on, 3-second timer, take five frames, and choose the best one later. That’s usually enough to feel the difference right away.